

Zyggy’s not the only one who should Read Signals
With Pro Tour Las Vegas quickly approaching, diving deeper into how to draft Omens of the Third Age has never been more important. Any competitor will tell you that in order to succeed in these split format events you need to be successful in draft, and the margin by which you can achieve that will greatly reduce the pressure on your Classic Constructed portion. As I’ve been playing with the set more I can’t help but appreciate the depth Omens has and how expressive both the drafting and gameplay of the format feels. I think Omens has a very unique draft landscape relative to previous sets, and that there are lots of edges to be gained over the competition. As an avid drafter, my hope with this article is to share a little bit of my experience and opinions on the format to help you better prepare for any Omens draft pod you sit down for.
Draft Fundamentals
I want to start by taking some time here to address fundamentals I think will be critical for aspiring draft players from newcomers to veterans alike. While each of your pods will be unique and packs will always have variation, when you boil it down I always consider drafting an exercise primarily in information gathering. My approach to drafting has always been to gather the most accurate information possible so that I can exploit it for any advantage I can get. In order to dive into the details of this I’m going to run you through how an Omens pack breaks down. This is a key concept to leverage and is necessary to gather information and play this game at the highest level.
Pack Breakdown
By understanding how Omens packs can be generated you’ll be able to piece together what’s been taken from it as you progress through different picks. I’ve summarized my understanding of the Omens pack breakdown below;
- Specific Hero Class Cards (Commons Only): There will be 6 or 7 cards from this pool in any Omens pack, containing class cards specific to Oscilio, Aurora, or Zyggy. I’ve noticed that there appears to be a possibility in this set for any split from 4-2-1 or 3-2-1 all the way to 2-2-2. What this means is that you need to be extra careful with this set in solely using the quantity of class cards as an indicator as to what’s been taken from a pack. For example, you could be passed a 2-2-1 split with 1 Zyggy class card, but the person who picked from that pack actually took an Oscilio or Aurora class card. You’ll only know with certainty early if you receive a pack with 0 class cards because each must have a minimum of 1.
- Lightning/Generic Cards (Commons Only): There will be 3 or 4 cards from this pool in any Omens pack, containing primarily Lightning talent cards with a chance for 1 Generic card regardless of there being 3 or 4 cards in total from this section. The variability in this pool should always combine with the class cards to equal a total of 10 of the 14 cards in any given pack.
- Equipment, Rare, Rare+, and RF: These 4 cards will always be constant in any Omens pack, and while there is the largest range of variability on what these could be, it's important to keep in mind which cards may not be printed in RF (these are usually reprints). Critical for this set is the exclusion of the suite of Seeker’s and Astral Sanctuary equipment as RFs, meaning you will only ever find these in the 1 Equipment slot.
Mastering this concept will allow you to try and deduce what the players passing to you may be navigating their draft towards. Combine this with controlling the information you send after each pick and you set yourself up for a deadly combo of steering the pod where you want it to go and/or capitalizing on an open opportunity others neglect.
Impressions of the Set
The general vibe I’ve gotten from Omens really makes me value the synergy and strength of the decks I draft. I find that I prefer to draft my decks with a win condition in mind, or multiple synergies that pair nicely together. Having a deck with synergy will allow you to convert your 4-card hands more consistently, which is one of the pillars of this format. It’s very common for players to take setup turns and pass back to you, or for you to have full tempo and need to continually convert your pressure.
With no unconditionally activatable weapons, fatigue doesn’t generally seem like an angle most games take, and the ones that do feel like they came down to lower card quality and being more defensive rather than building a deck to win. Another very critical thing in the set is the variability in card strength vs each individual hero. Being able to sideboard in cards with block values, the ability to block arcane, or cards that can be played as pseudo defense reactions can be very impactful in various matchups. This only further rewards players who are able to have the space in their drafts to prioritize picking up different tools for each matchup. This space is valuable, and you should always keep in mind that you can only average 4 cards from each pack, for a total of 12, that you can draft and not present in your 30 (this includes equipment).
Hero Overview
Now let’s take a dive into each of the three draftable heroes and my thoughts on how they generally play and what you should be thinking about when building a deck for each of them. I’ve even included an example of a 3-0 decklist for each of the heroes (with sideboards via Fabrary) to help you conceptualize what a winning deck should have.
Oscilio
Oscilio 3-0 Draft - AGE Article
This deck is a good illustration of how you can splash attacks, coupled with a strong equipment suite and ways to play multiple cards per turn.
In a lot of ways this hero feels like the most straight-forward to play of the three. He’s generally very aggressive and focuses on exploiting the evasive nature of his arcane damage. However, don’t be fooled by this temptation, I’ve found that pure-arcane Oscilio lists are much easier for opponents to sideboard into, and a lot of the time you’ll actually get extra value by abusing above-rate physical attacks into people holding a hand of clunky cards that only efficiently prevent arcane. You don’t need to overdo it, but leverage the fact that Embodiments of Lightning don’t go away until you play an attack action card. You can gain one from a variety of effects from Laced Lightning to Sigil of Lightning, allowing you to bide your time while you patiently set up your combo turn.
Another critical synergy for Oscilio is enabling Starfall on your turn to maximize the value from Volzar, Meteor Storm and the suite of cards that care about it (Meteoric Impact, Comet Collision, and any ‘Constella’ instant). Every time you trigger this synergy you’re essentially gaining (at minimum) another two evasive arcane damage for free. Therefore, I find myself valuing auras that leave the arena at the start of my turn very highly, as these don’t require tapping your hero or having to pay to destroy lightning flows. Some of the best examples are Sigil of Lightning (and we already highlighted the additional benefit from an Embodiment of Lightning), Haven Veil, Core Reaction, and even cards like the suite of Chromatic Refinement which synergize very nicely with all your 1-cost arcane spells. I find that if you factor in the 2 value these auras generate with Starfall synergy that most of them are insanely above rate; pair a yellow Chromatic Refinement with a yellow Meteoric Impact and you just made a 2-card 6 arcane from yellows. You don’t want too many of these cards, but I prefer them to make up the bulk of my instants and your ratios should help support the cards you want to resolve with Starfall.
Overall, to help visualize some of these powerful synergies I want to walk you through an example for each matchup:
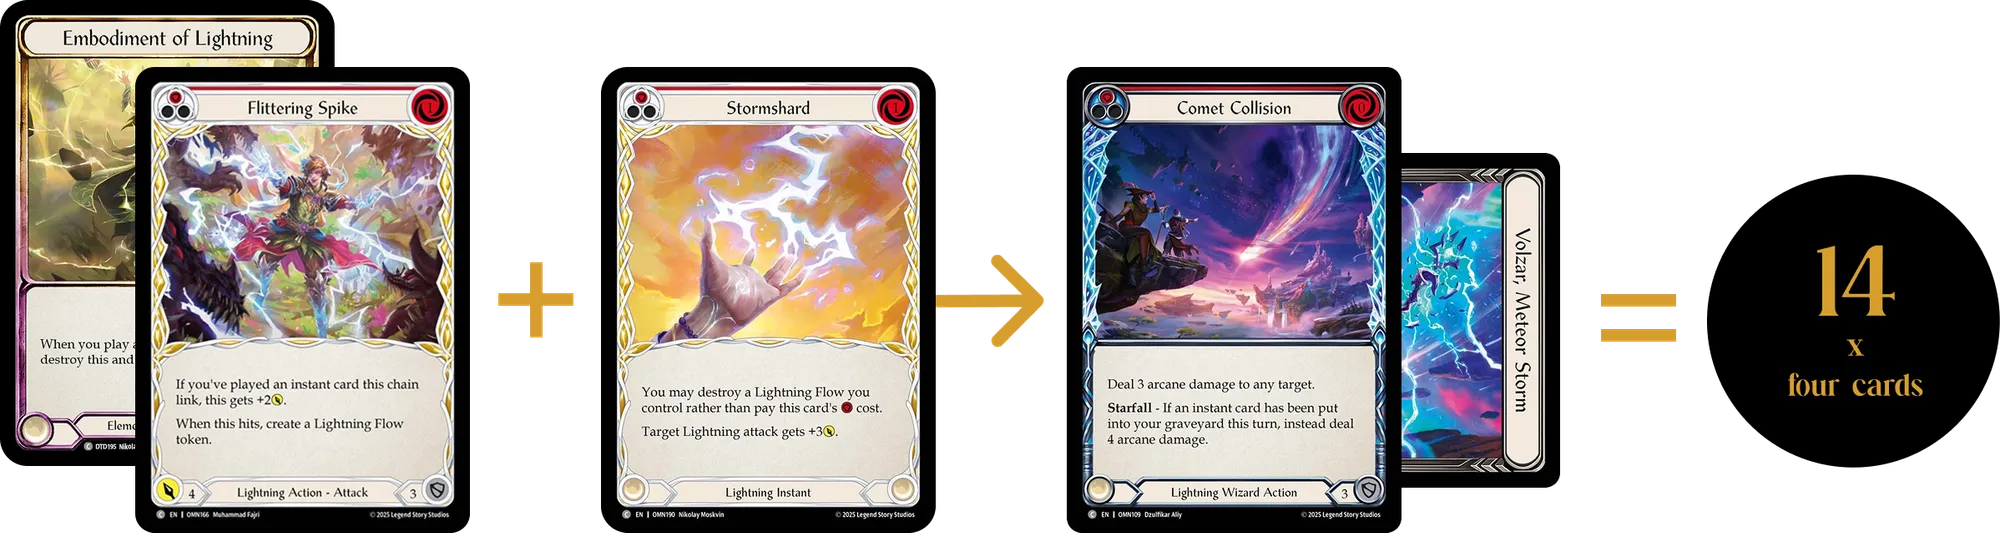
- Versus a Zyggy, who may be so inclined to use his plethora of Ward cards to block you, you can set up an Embodiment of Lightning and wait for your one copy of red Flittering Spike to come around – which you tuck neatly into your arsenal. Now when you draw your Stormshard it's time to send a sneaky 9 physical damage into any arcane spell like a red Comet Collision for another 5 arcane with Volzar. Turns like this will usually break games wide open in Limited. The order in which you arsenal certain pieces may change, but you’re constantly trying to set up these types of synergies for very big individual turns by either carrying value forward or arsenaling pieces and waiting until the picture comes together.
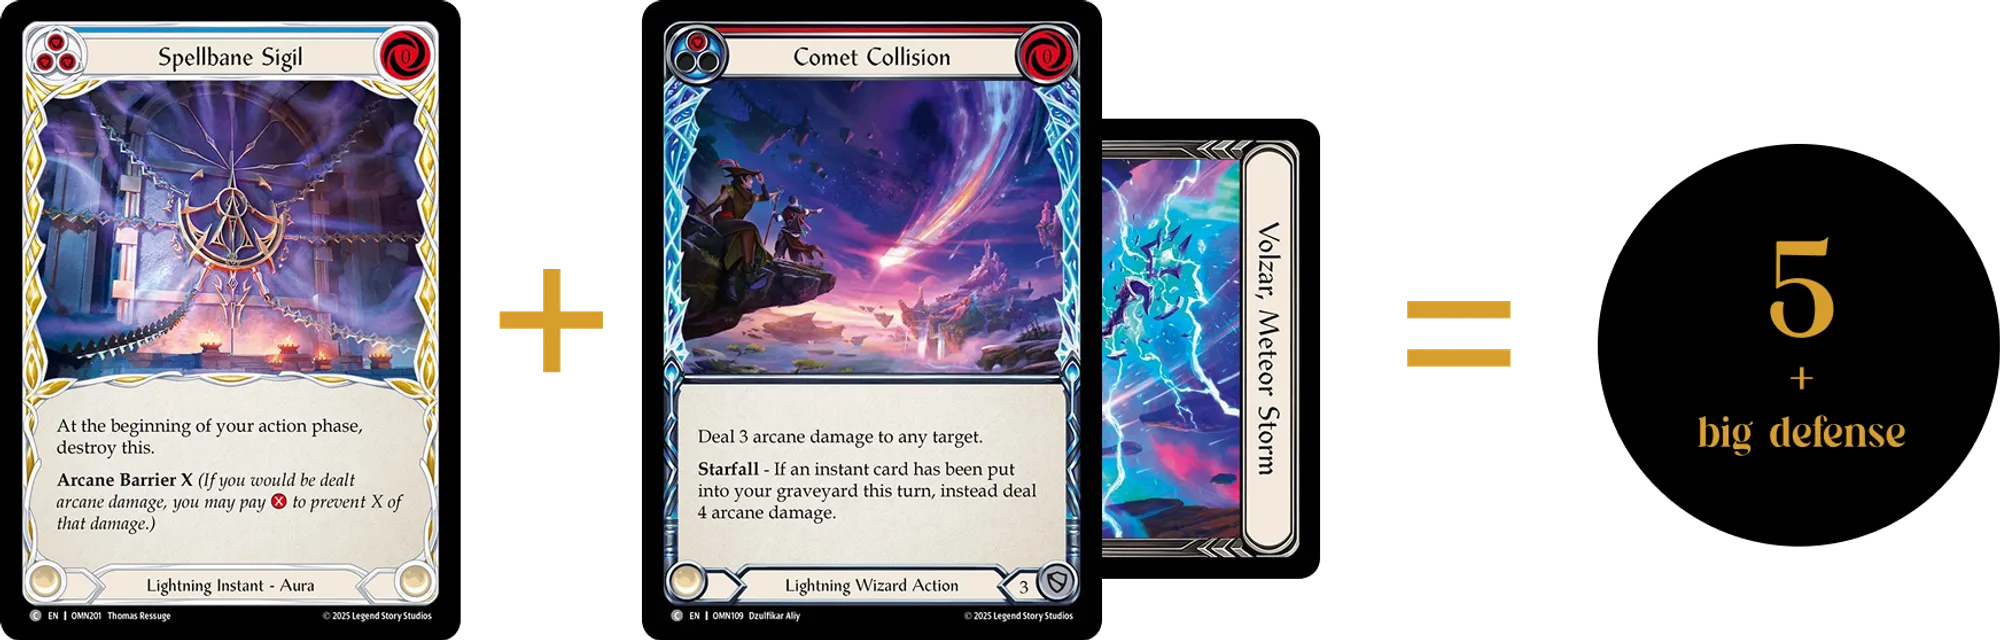
- Versus a fellow Oscilio, maybe you’ve tucked a Spellbane Sigil in your arsenal and you are waiting for the right moment. Now, as your opponent’s turn starts with a Core Reaction breaking you can convert up to three cards from your hand defensively to negate this damage. Furthermore, your opponent was probably hoping to pair Core Reaction with another arcane spell – thereby benefiting from Starfall – like Meteoric Impact; which you can also now effortlessly prevent. Even better, as you head into your turn, Spellbane Sigil leaves the arena and turns on Starfall, allowing you to utilize Volzar in combination with something like a Comet Collision for a game winning turn cycle.
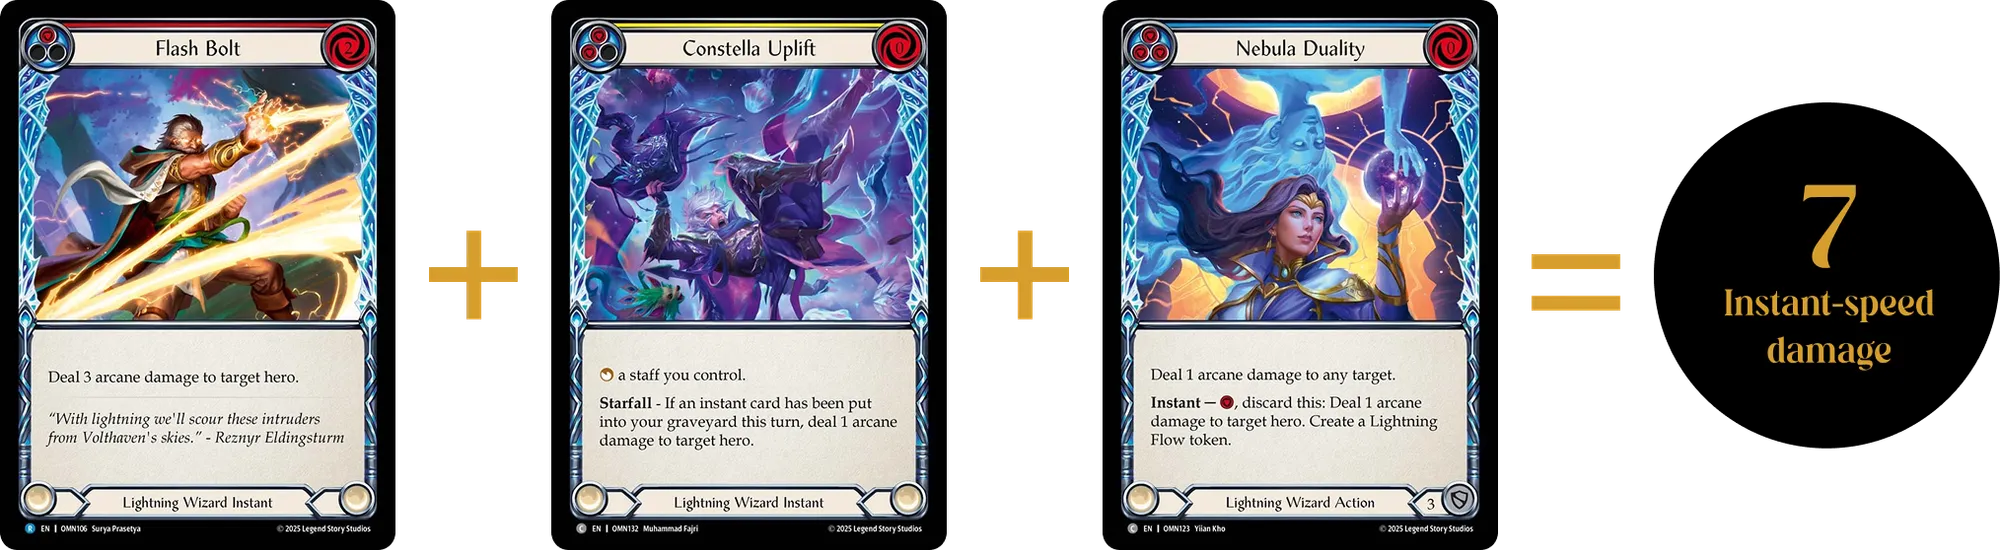
- Lastly, versus an Aurora, perhaps you’ve put a red Flash Bolt in your arsenal as a powerful card that you don’t want to send by itself. Maybe you can do a flashy Kano cosplay on their turn in combination with cards like Constella Uplift and/or the flexible Nebula Duality to just end the game on the spot with unexpected reach. Or maybe during an earlier portion of the game this allows you to wait and pair it up with a blue and a Meteoric Impact on your turn to truly break the game open and ask if your opponent has any way to fully convert their hand to even have a chance at survival.
Zyggy
Ziggy 3-0 US Nationals Draft - AGE Article
This one gets bonus points for this being day 2 of US Nationals, and a great example of what an aggressive Zyggy deck could look like.
I’ve found Zyggy to be one of the more unique decks of the format, where you can really build them in a few ways and even play each matchup differently. At face value Aphrodias is the most powerful weapon in the set, but it’s also the hardest to consistently turn on. You also have the advantage of having class cards with Ward, giving you significantly more options to prevent arcane damage than the other heroes. What I find most interesting about Zyggy is the Fragment effects, generally the color of these 0 cost Fragment cards is irrelevant as a single card block will prevent any damage. However, gaining incremental value from the actual Fragment triggers is what makes a Zyggy deck stronger (i.e Lightning Flows from Shattering Flowtide or go again from Ebbing Arcstride ). There’s also a balancing act for how many instant auras you should be playing, which I think depends largely on how much Lightning Flow generation your deck has. I find that these auras are powerful, but you really need to activate Zyggy and give them Holo Counters for full value, which you can only do a limited amount of times each game.
Whenever I draft a Zyggy deck I’m trying to identify what style of deck I’m building and what cards seem to be open in the pod. Maybe I’m playing a more defensive build centered around powerful auras like Corrosive Space Dust where I’m trying to whittle them down with arcane damage from Aphrodias. Or, you could play an aggressive Zyggy that leverages the above rate red rare Fragment and even powerful lightning cards . Maybe you want to pivot into a very heavy prevention build to try and deck out Oscilios. Overall, I don’t think there’s a right or wrong approach but that the focus should be on identifying which direction the pod supports.
Since there are a lot of different Zyggy archetypes available, I want to walk you through some examples that highlight the divergent paths you can go down:
Leveraging Aphrodias:
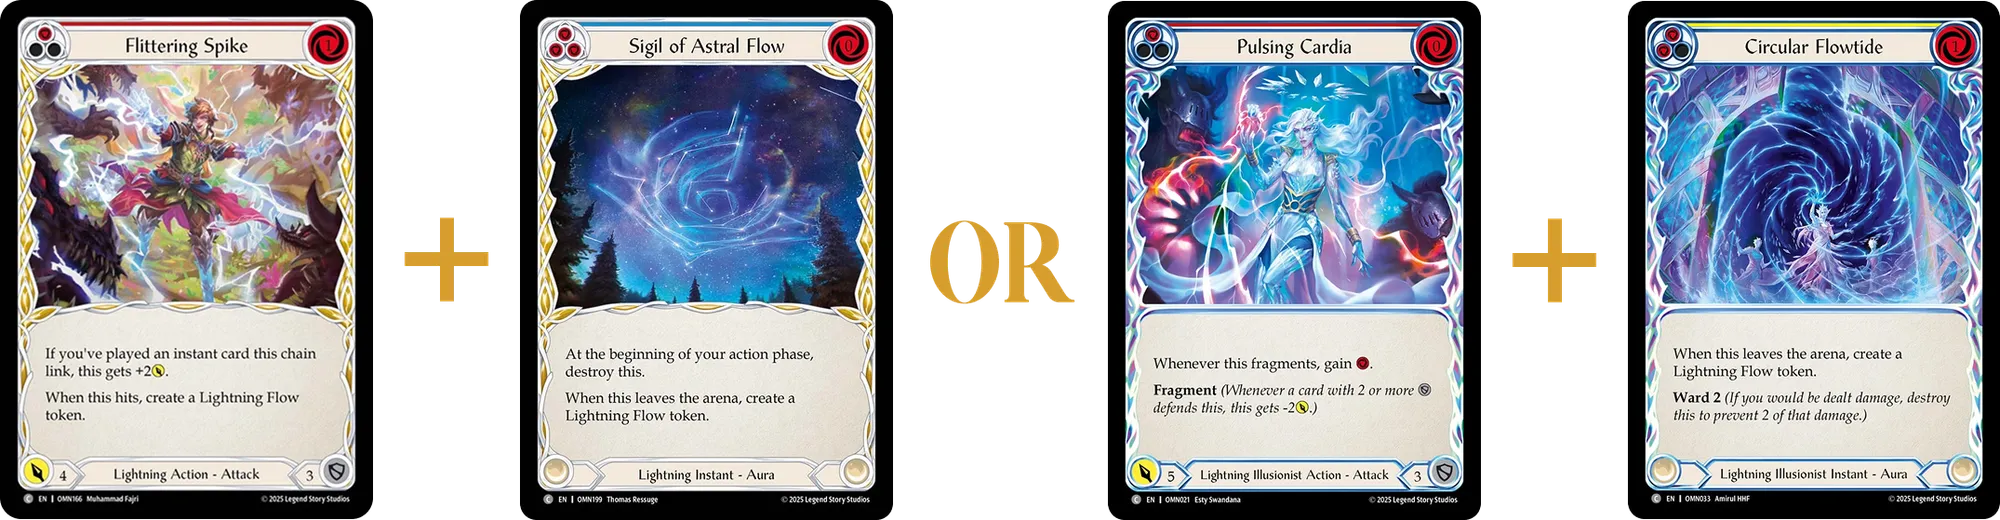
As the strongest weapon, I always want to be activating Aphrodias as much as I can while not losing value. The tricky thing in a lot of these situations is that you’re gated by Lightning Flow tokens. It’s why I actually prioritize having a few Lightning Flow neutral auras in my deck like Circular Flowtide or Sigil of Astral Flow . While these cards by themselves may not seem that powerful, I consider them an opportunity to convert a blue card into 2 free damage from my weapon on either turn. What really elevates having some of these cards in your deck is when you’re able to double dip by gaining some type of value on your turn (i.e Flittering Spike - Sigil of Astral Flow OR Pulsing Cardia - Fragment - Circular Flowtide for free), and then follow that up on your opponent’s turn with the singular blue play. This doesn’t always have to be with flow-neutral auras either, doing the same strategy with powerful auras like Corrosive Space Dust or Nourishing Glow will also net you additional value from Zyggy’s activation. I find that having this value engine in any Zyggy deck will greatly benefit you, especially on lackluster turns when your opponent can’t convert their full hand.
Aggression:
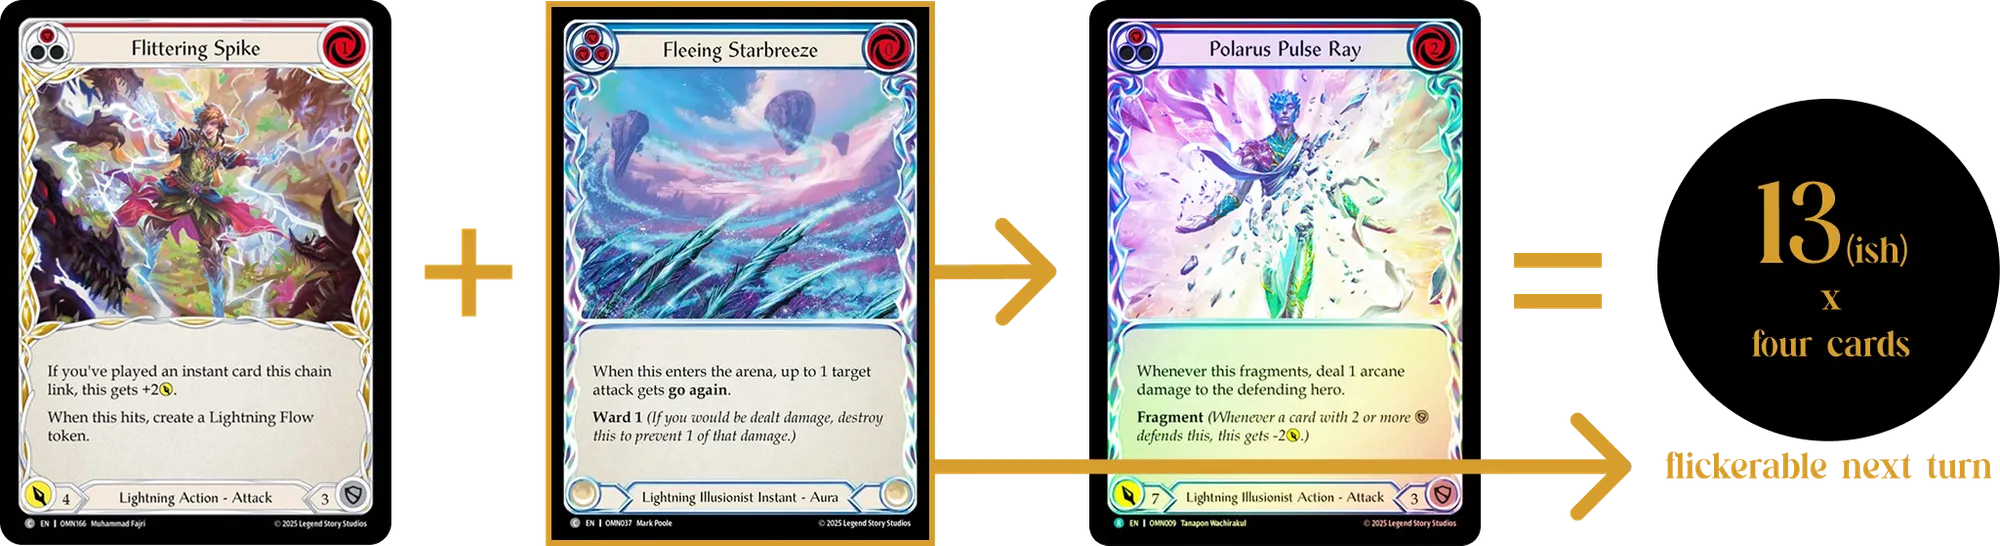
Don’t neglect aggro. Zyggy can blast with the best of them. All of the rare red Zyggy Fragment cards are haymakers by themselves, and there’s no reason we can’t add powerful lightning cards like Electrolyze or Flowing Stormstrike. One of my favorite cards to have in an aggressive build of Zyggy is Fleeing Starbreeze; this card can enable some truly disgusting turns when you’re given space. Combine it with Flittering Spike and end on something like a Polaris Pulse Ray. Usually this card creates such powerful turn cycles that your opponent will block out and give up tempo, providing you a second opportunity to use the card on your following turn with Zyggy. There’s also always the classic Auric Shards combo for lethal out of nowhere, especially if your opponent really doesn’t want to block to turn on nasty Fragment triggers. Overall, there’s a lot of ways you can step on the gas as Zyggy; the critical thing is to make sure that you have some avenues for this approach.
Aurora
Aurora 3-0 Draft - AGE Article
While this deck definitely had less equipment than I would’ve preferred, the card quality is insane and this is a great example of what a deck trying to convert hands offensively every turn would look like.
You’d think the Runeblade of the set would be the most straightforward to play, however – in my experience – Aurora is the hero that requires the most synergy for her deck to function properly. As the gold standard for aggro, you need to be able to consistently convert your hands to apply the maximum amount of pressure. This requires you to gain go again from Embodiments of Lightning or cards like Thunderous Retort and Quick Succession to get the full value from cards with Quickstrike or to even use all your cards offensively on a turn. While you may pivot between setup and large offensive turns, being able to consistently convert four cards will help you stay competitive against decks like Oscilio that don’t generally give you a lot of options to utilize your cards defensively. Generally in this format I find that once your opponent is forced to continually block you for multiple turns, and you can continue converting, you’ll walk their life down and claim a victory.
With go again being a requirement for this deck, I want to expand on my favorite options you can draft different decks to achieve. Level one is always going to be Aurora’s hero text where you can convert a Lightning Flow into an Embodiment for the cost of 2 resources. While this is not always the most efficient, it allows you to bank Lightning Flows to use as you need and encourages setup turns with a 1-cost 5 power attack pitching a blue (important to note you can start your turn with an Embodiment and then also use Aurora part way through the turn to help facilitate going three or four chain links wide). Laced Lightning is always going to be top tier, and being able to use this while going second feels like cheating. Thunderous Retort can help you block against Oscilio and then at a minimum allow you to convert with a 0 for 4 into Scorpio.
Equipment comes at a premium in this format and, once your opponent is out of the Astral Sanctuary suite in particular, Scorpio really ramps up in its potency. This lack of equipment also increases the difficulty for your opponent to block the arcane ping from Path of Same Ends, which also threatens any Lightning Flows they may want to keep. The best part about Path is the flexibility; it allows you to pay to gain go again if the opponent chooses to block the arcane, or simply resolve a 0-cost 4 go again card. Overall, regardless of the source, you want to draft cards that will synergize together and lay the smack down against your opponent each turn cycle. The elegance of Aurora is that her strategy doesn’t significantly change between matchups, she simply wants to convert and press down on the gas pedal, exploiting her opponent’s hand which may not block well or which may contain important cards they want to keep to implement their own strategy.
I’ll walk you through some turn cycle examples that illustrate powerful things you should be doing. If you can achieve any turns similar to these during a limited game you’ll win significantly more games as you approach the ceiling of what Aurora can do:
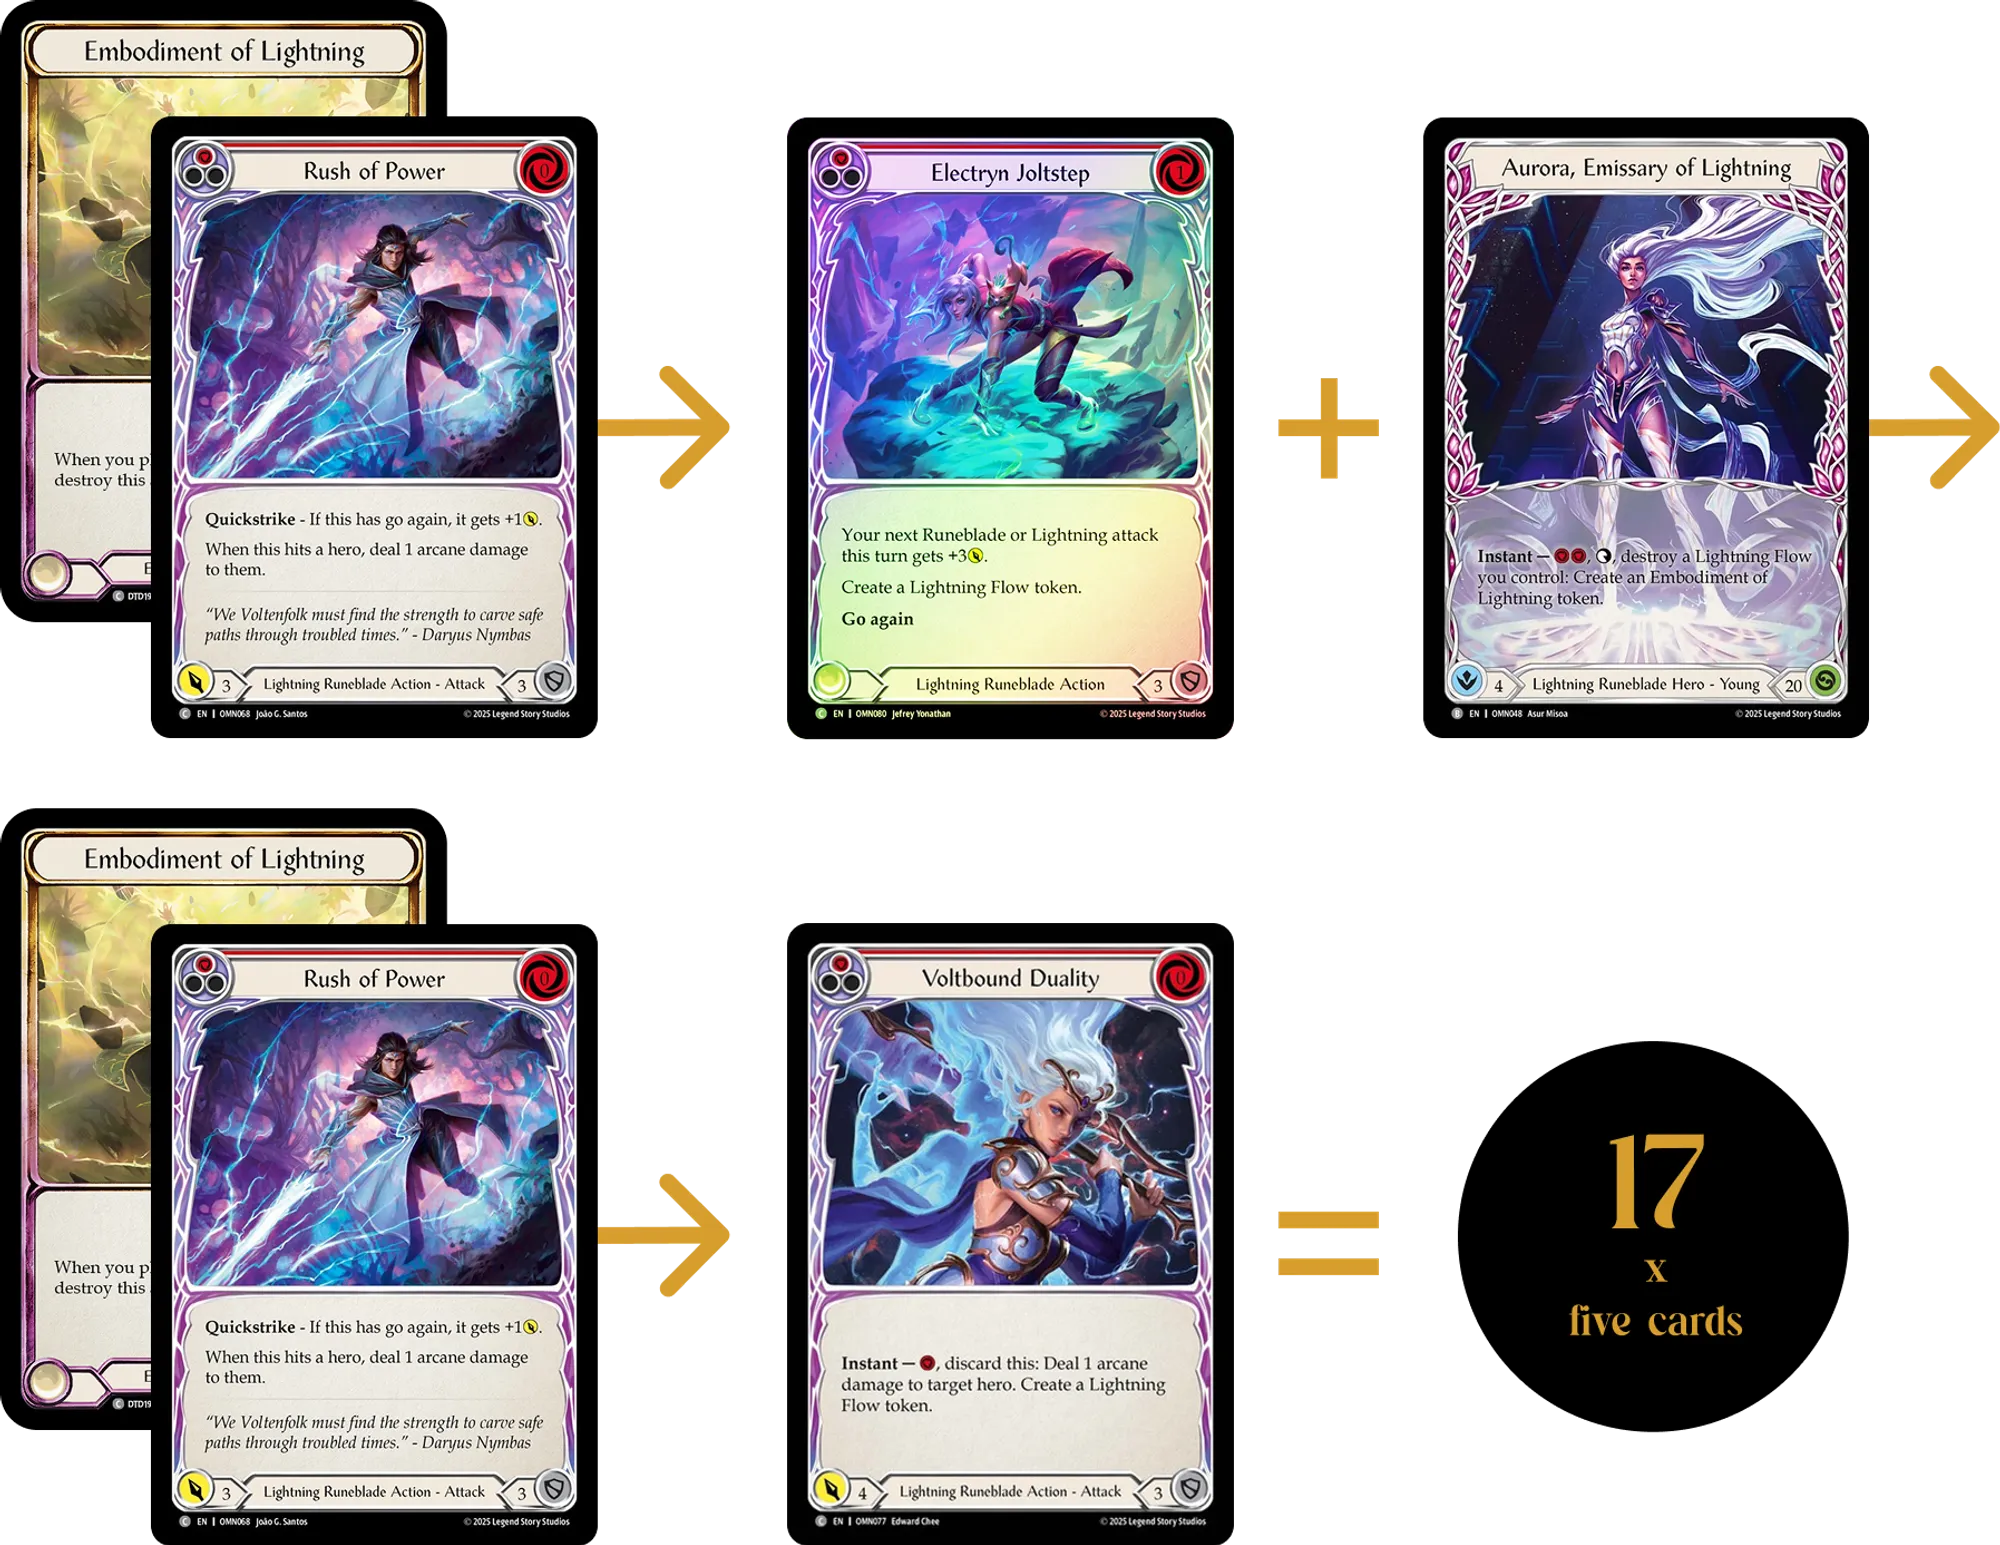
- Starting a turn with an Embodiment of Lightning and an arsenal unlocks so much potential. For example, you could lead with Rush of Power from arsenal, followed by a red Electryn Joltstep into Aurora’s hero ability by pitching a blue. Next, you continue the combat chain with any 0-cost attack, ideally one with additional Quickstrike value like Destructive Fleetfoot or another Rush of Power, and finish up with another 0 for 4 or Scorpio while putting a go again piece like Quick Succession in your arsenal for next turn.
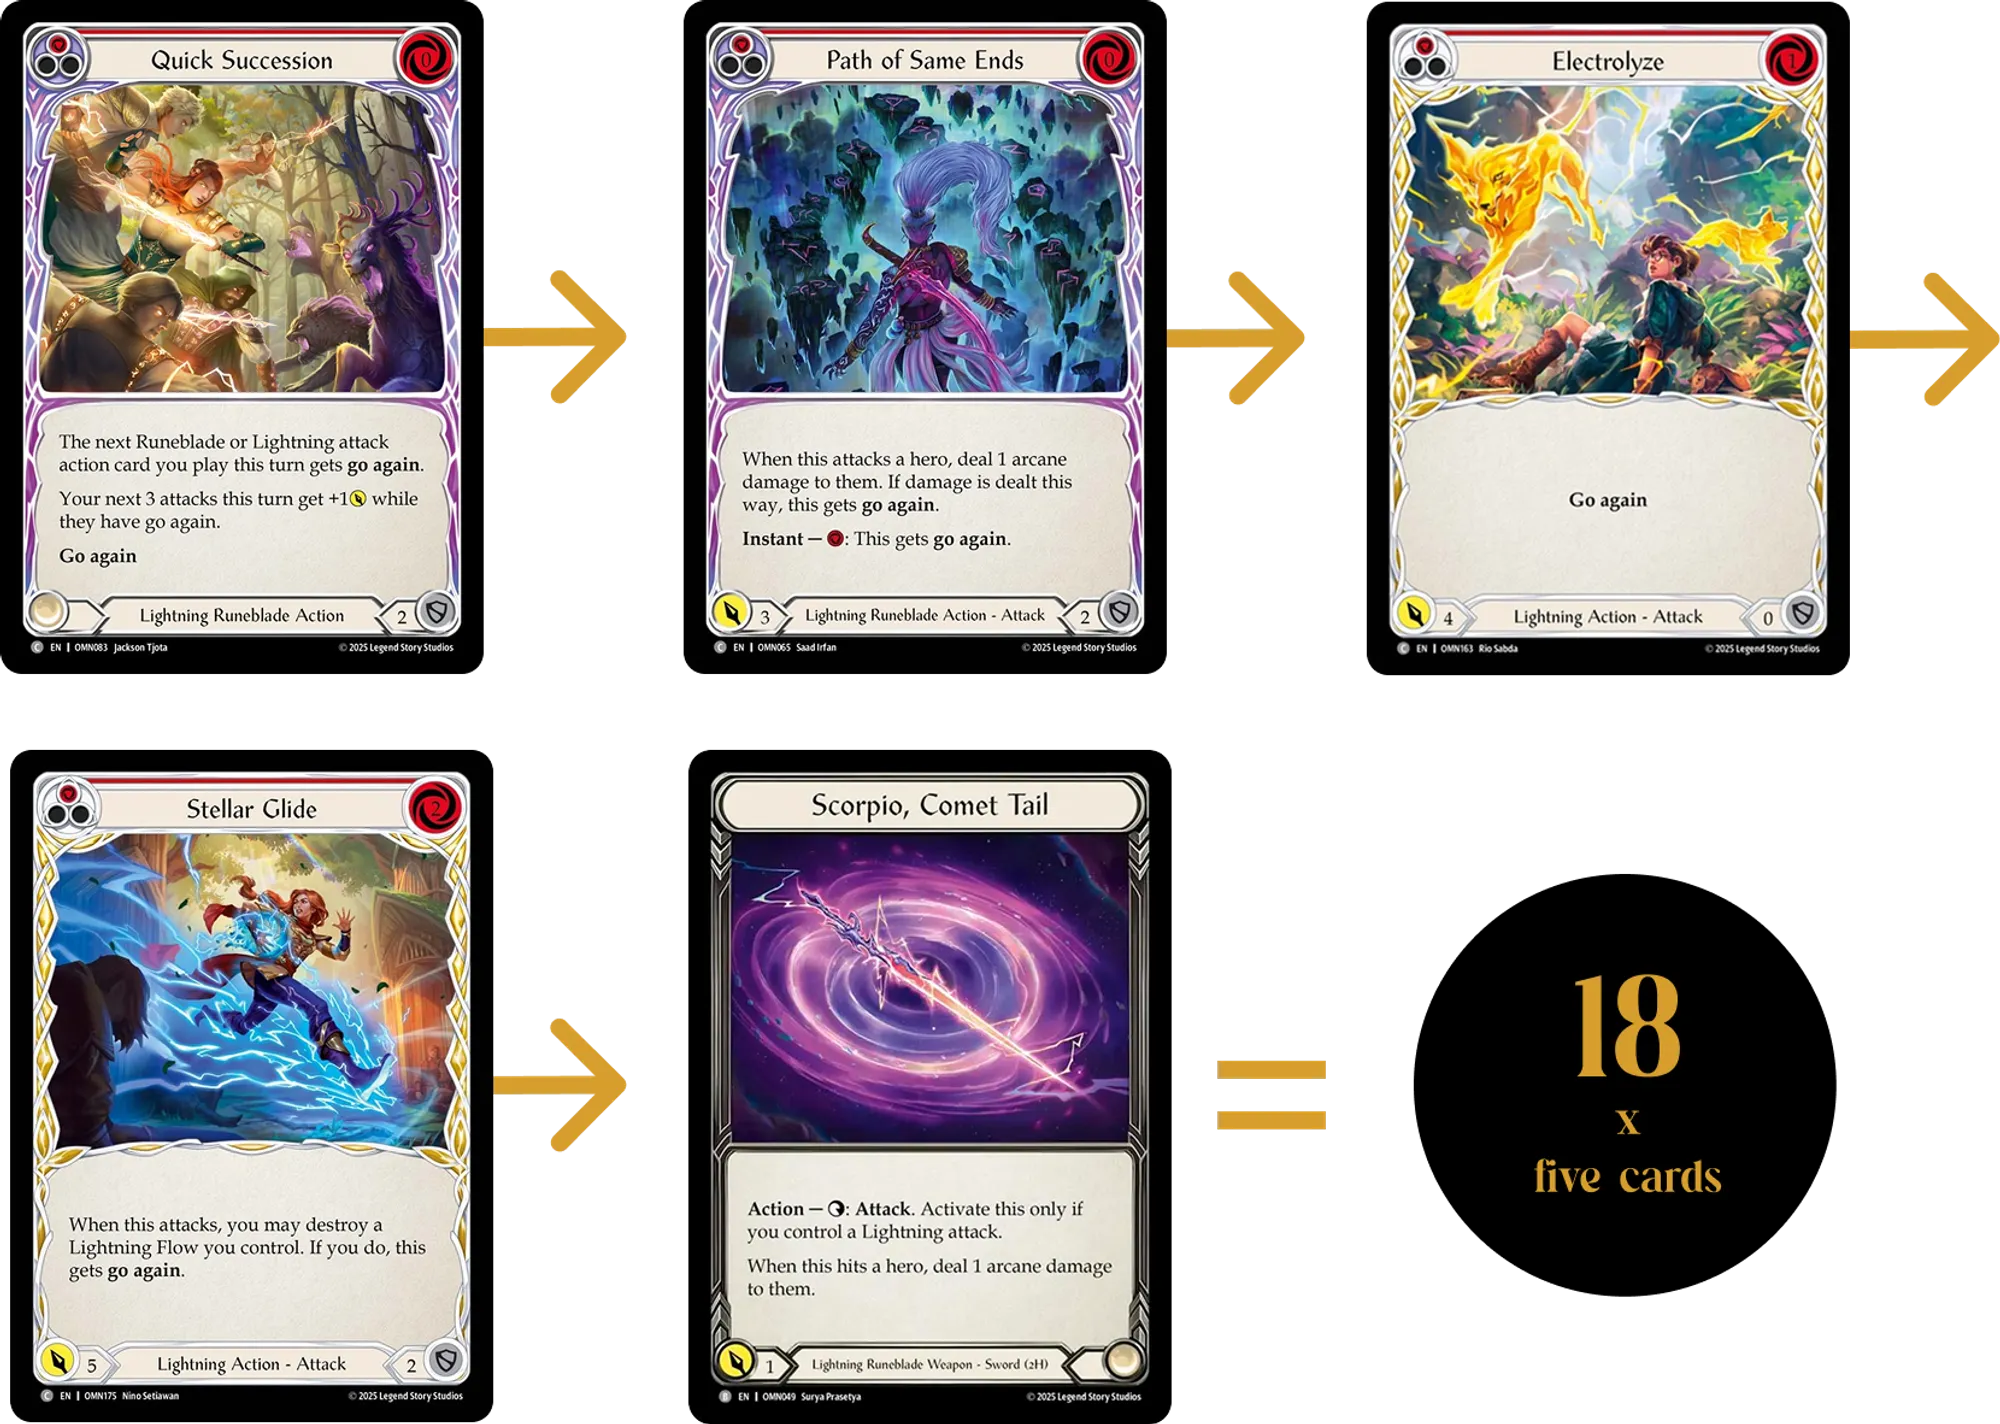
- Sometimes you can assemble a wide turn starting with nothing, and this highlights the importance of cards that synergize together to send multiple chain links. If you start with Quick Succession into Path of the Same Ends you can follow up with Electroyze or Stellar Glide and put the cherry on top with a swing of Scorpio. Being able to get at least two additional value from a yellow or red Quick Succession adds up very quickly on turns like this.
Favorite Cards
Next, I wanted to share some of my favorite cards for each of the heroes. Generally I want lots of these types of cards in my deck when drafting, and when they’re passed to me I consider this a signal that the hero may be open. To note, heroes like Oscilio and Zyggy really want the rares from this set whereas Aurora’s power is generally unlocked by the commons.
Oscilio
- Flash Bolt: This card is so flexible in supporting the strategy that every Oscilio employs. Use them to kill your opponent at instant speed with surprisingly high reach, or combo as more than 1 source of arcane damage on your turn that can also enable Starfall.
- Core Reaction: Another way to deal arcane damage without needing an action point while turning on Starfall synergy. Playing this on the first turn of a game increases your chances to win substantially.
- Aethersling: A powerful card that is generally very hard to block in the format, it will often allow you to play two action speed cards in one turn which greatly speeds up your clock, especially if your opponent ever gets stuck with a hand they can’t convert.
- Haven Veil: One of the few defensive-oriented auras that can turn on Starfall. Whether blocking an Aphrodias, anything in the mirror, or incremental pings of 1 arcane from Aurora I find this card can easily get at least 2 value on your opponents turn and then another 2 on yours from Starfall synergy. 0 for 4 is always going to be textbook good in limited.
- Laced Lightning: Start in play equipment is always powerful, but having the ability to make an Embodiment of Lightning on demand from turn 0 and save it for your one big turn is a very flexible and consistent piece for any Oscilio deck splashing attack action cards.
Zyggy
- Corrosive Space Dust: The strongest aura you can have in a deck, it’s literally an upgraded Holo Shield. Arcane damage is hard to prevent in this format, and this gives you a way to double up from the damage on your Aphrodias while still blocking!
- Blink of an Eye: In the right situations this card is just downright broken, a lot of times your opponents almost have to declare no blocks in fear of what you might do if they trigger Fragment. It’s a lose/lose situation for them, and you have plenty of ways to punish them whether that’s pumping an Auric Shards after no blocks or dumping a bunch of auras you can flip for free and blasting them with Aphrodias.
- Fraying Lifeforce: Of the rare Fragment cards this is my favorite, gaining life is never bad and it allows you to be more loose with breakpoints while still applying pressure.
- Shattering Flowtide: For the common Fragment cards I strongly prefer this, and all the colors are powerful. You need Lightning Flows for this deck to function, and these all demand one card or deal 3-5 damage.
- Circular Flowtide: Making enough Lightning Flows is important, and this is one of the most efficient ways to do it. Combine that with being a net neutral Lightning Flow target for Zyggy, and you have a solid roleplayer I’d love to have in any of my Zyggy decks.
Aurora
- Dashing Flashfoot: The Runeblade rare with the highest value, allowing you to present very challenging breakpoints that threaten the coveted Embodiment of Lightning token without activating your hero ability. It allows you to assemble a super turn on the fly with one of the most efficient ways to gain go again on successive attacks.
- Path of Same Ends: One of the strongest roleplayers for an Aurora deck, for the tradeoff of blocking 2 instead of 3 you have a lot more flexibility in gaining go again. The floor of this card is solid, but when your opponent runs out of convenient ways to prevent the arcane damage this becomes insanely above rate.
- Stellar Glide: I think this is one of the strongest cards for Aurora that people overlook. Most decks are going to be paying 2 resources to activate Aurora more than once during a game, and this card simply removes the cost of tapping your hero in exchange for a 0 cost 5-power attack. And it gets even better. You also have flexibility where you could combine this on a turn where you also want to use Aurora to give a different attack go again.
- Quick Succession: The consistency glue that holds all Aurora decks together, no strings (like Lightning Flows or auras popping at the beginning of your turn) attached go again. As a bonus, you have ways to get additional damage from this card and it’s also a great blue or yellow to have pitched for your second cycle once your premium cards start to thin out.
- Electrolyze: A hallmark in any of the heroes, but particularly in Aurora because of her desire for consistent aggressive pressure. You can slot this into basically any turn and add an additional go again card in for free. Also synergizes very well with Quick Succession on chain links 2+ to maximize the extra buffs.
Conclusion
I hope that with this article I’ve helped share some of my thoughts on the format with you. This is a contender for one of my favorite Limited sets of all time for Flesh & Blood. I feel like I could talk about it for hours upon hours. For anybody competing in Pro Tour: Las Vegas I wish you luck, feel free to pick my brain on draft at the venue or just come by and say hello. I’d love to get more opportunities to play this set in the future and it might even become a staple for me casually from time to time.

Alexander Vore
Professional FaB enjoyer, constantly brewing bad decks until they live long enough to become the villain. Pump draft directly into my veins.