

Introduction - Your Brain is the Toolbox
Vynnset’s toolbox is designed to reduce her opponent’s life to zero. Because she struggles to sustain beyond a finite point, Vynnset must end the game by killing her opponents, and they know it. In the current metagame filled with defensively slanted contenders, you and your opponents will start most games aware that it’s up to you to get across the line. If you can’t, they will win by default. That dynamic colors most Vynnset games, but even experienced opponents can underestimate Vynnset’s lethality.
Vynnset herself is a scholar of the deep arcane. You can follow her example by expanding your knowledge of the deck’s intricacies and learning new ways to deploy your cards to devastating effect. This article will go over the strategies you can use to approach different matchups and how to execute the many tactics Vynnset uses to achieve them.
Your toolbox of game pieces may be limited to 80 cards, but with knowledge of the techniques in this guide, you can equip yourself with the tools to tackle this metagame and whatever comes next.
Macro - Navigating True Aggro, True Fatigue, and Everything In Between
If you’ve spent any amount of time playing Vynnset, you’ve probably encountered the idea that she has two basic strategies based on her opponent’s gameplan. You can play midrange against aggressive opponents by relying on the absurd value of individual Rune Gate cards, or you can set up against defensive opponents by relying on Vynnset’s capacity to hold large amounts of damage in her banished zone.
To facilitate this switch-board approach, my own deck has a core of 50 cards plus equipment with two loose inventory packages of about 10 cards each. I refer to my own card choices throughout this article because I have so much experience with my specific 80, but this article isn’t necessarily about my deck so much as it is about how you can apply similar principles to your own card selections, sideboarding choices, and gameplay decisions. The deck will need to adjust as new tools and new threats are introduced with Usurp the Shadow Throne, so I want to help you think about the hero as a whole rather than one specific list. The following sections will describe how I address aggro and fatigue opponents on a general level as well as what I do when my opponent’s deck doesn’t fit neatly into one box or the other.
My specific 80 (for those that are curious):
AGE NE Open September 1st Place
How to Survive True Aggro
True aggro decks have traditionally been considered some of Vynnset’s best matchups. The idea behind this perspective is that aggro decks simply can’t keep up with Vynnset when she plays midrange; her combination of damage and disruption is just too crippling. When you are sure your opponent will try to convert every hand they draw into offense, playing good midrange FAB is generally a sound strategy, but getting bogged down in defensive efficiency can cause you to lose sight of Vynnset’s win condition.
Remember that Vynnset is not a defensive deck. You cannot fatigue Fai. On the contrary, it is more likely that he will fatigue you. Even against aggro decks, you need to threaten lethal and start forcing them to block within a reasonable number of turns. That means you will likely need to send at least one double Rune Gate turn. Use your Widespread Destructions, Annihilations, Culls, and Succumb to Temptations to keep your opponent off five card hands and block efficiently to buy the space you need to make that offensive push. Most aggro games become a kind of controlled race. You’re trying to slow them down while applying constant, meaningful pressure and disruption.
You lose these matchups by drawing too many hands that cannot present an attack, which is doubly painful because most of your attack cards are also your 3-blocks. Even seemingly unloseable games can quickly unravel when you draw a hand containing four non-attack actions, but there are a couple of things you can do to mitigate these disaster scenarios.
I mentioned before that you should try to set up at least one double Rune Gate turn during the game, but this approach also serves to smooth out non-attack hands by banking at least one attack in your banished zone. Even if I’ve tried to play carefully, sometimes an attack still isn’t available. At that point I usually take stock of my Runechant situation and then the life totals to decide if I should attack with Flail of Agony. If my Runechant production is lean, or my life total is far below my opponent’s, I usually choose to save my Runechants. If my Runechant production is humming along, and my opponent is starting to dip low in life, I usually attack with Flail to keep the pressure up, especially if I have armor remaining. Even measly old “Flail for one” can present something meaningful when it comes along with 5 ‘chants, and a Cull.
How to Overcome True Fatigue
True fatigue is less common than you might expect. There just aren’t that many decks that genuinely struggle to convert five-card hands into damage or disruption, but some do exist. While fatigue decks have long been labelled as a tough matchup for Vynnset, I hope I can persuade you to love playing into them as much as I do. Though it is rare, a Teklo or a Huntsman will sometimes allow me to set up a truly massive combo turn threatening 30–40 damage, and it’s those games that make me love the hero as much as I do. My record combo turn is 45 damage! If I remembered that turn’s details, I would have included it here, but I couldn’t piece it together exactly, so you’ll have to settle for the puny 36 damage combo shown as an example here:
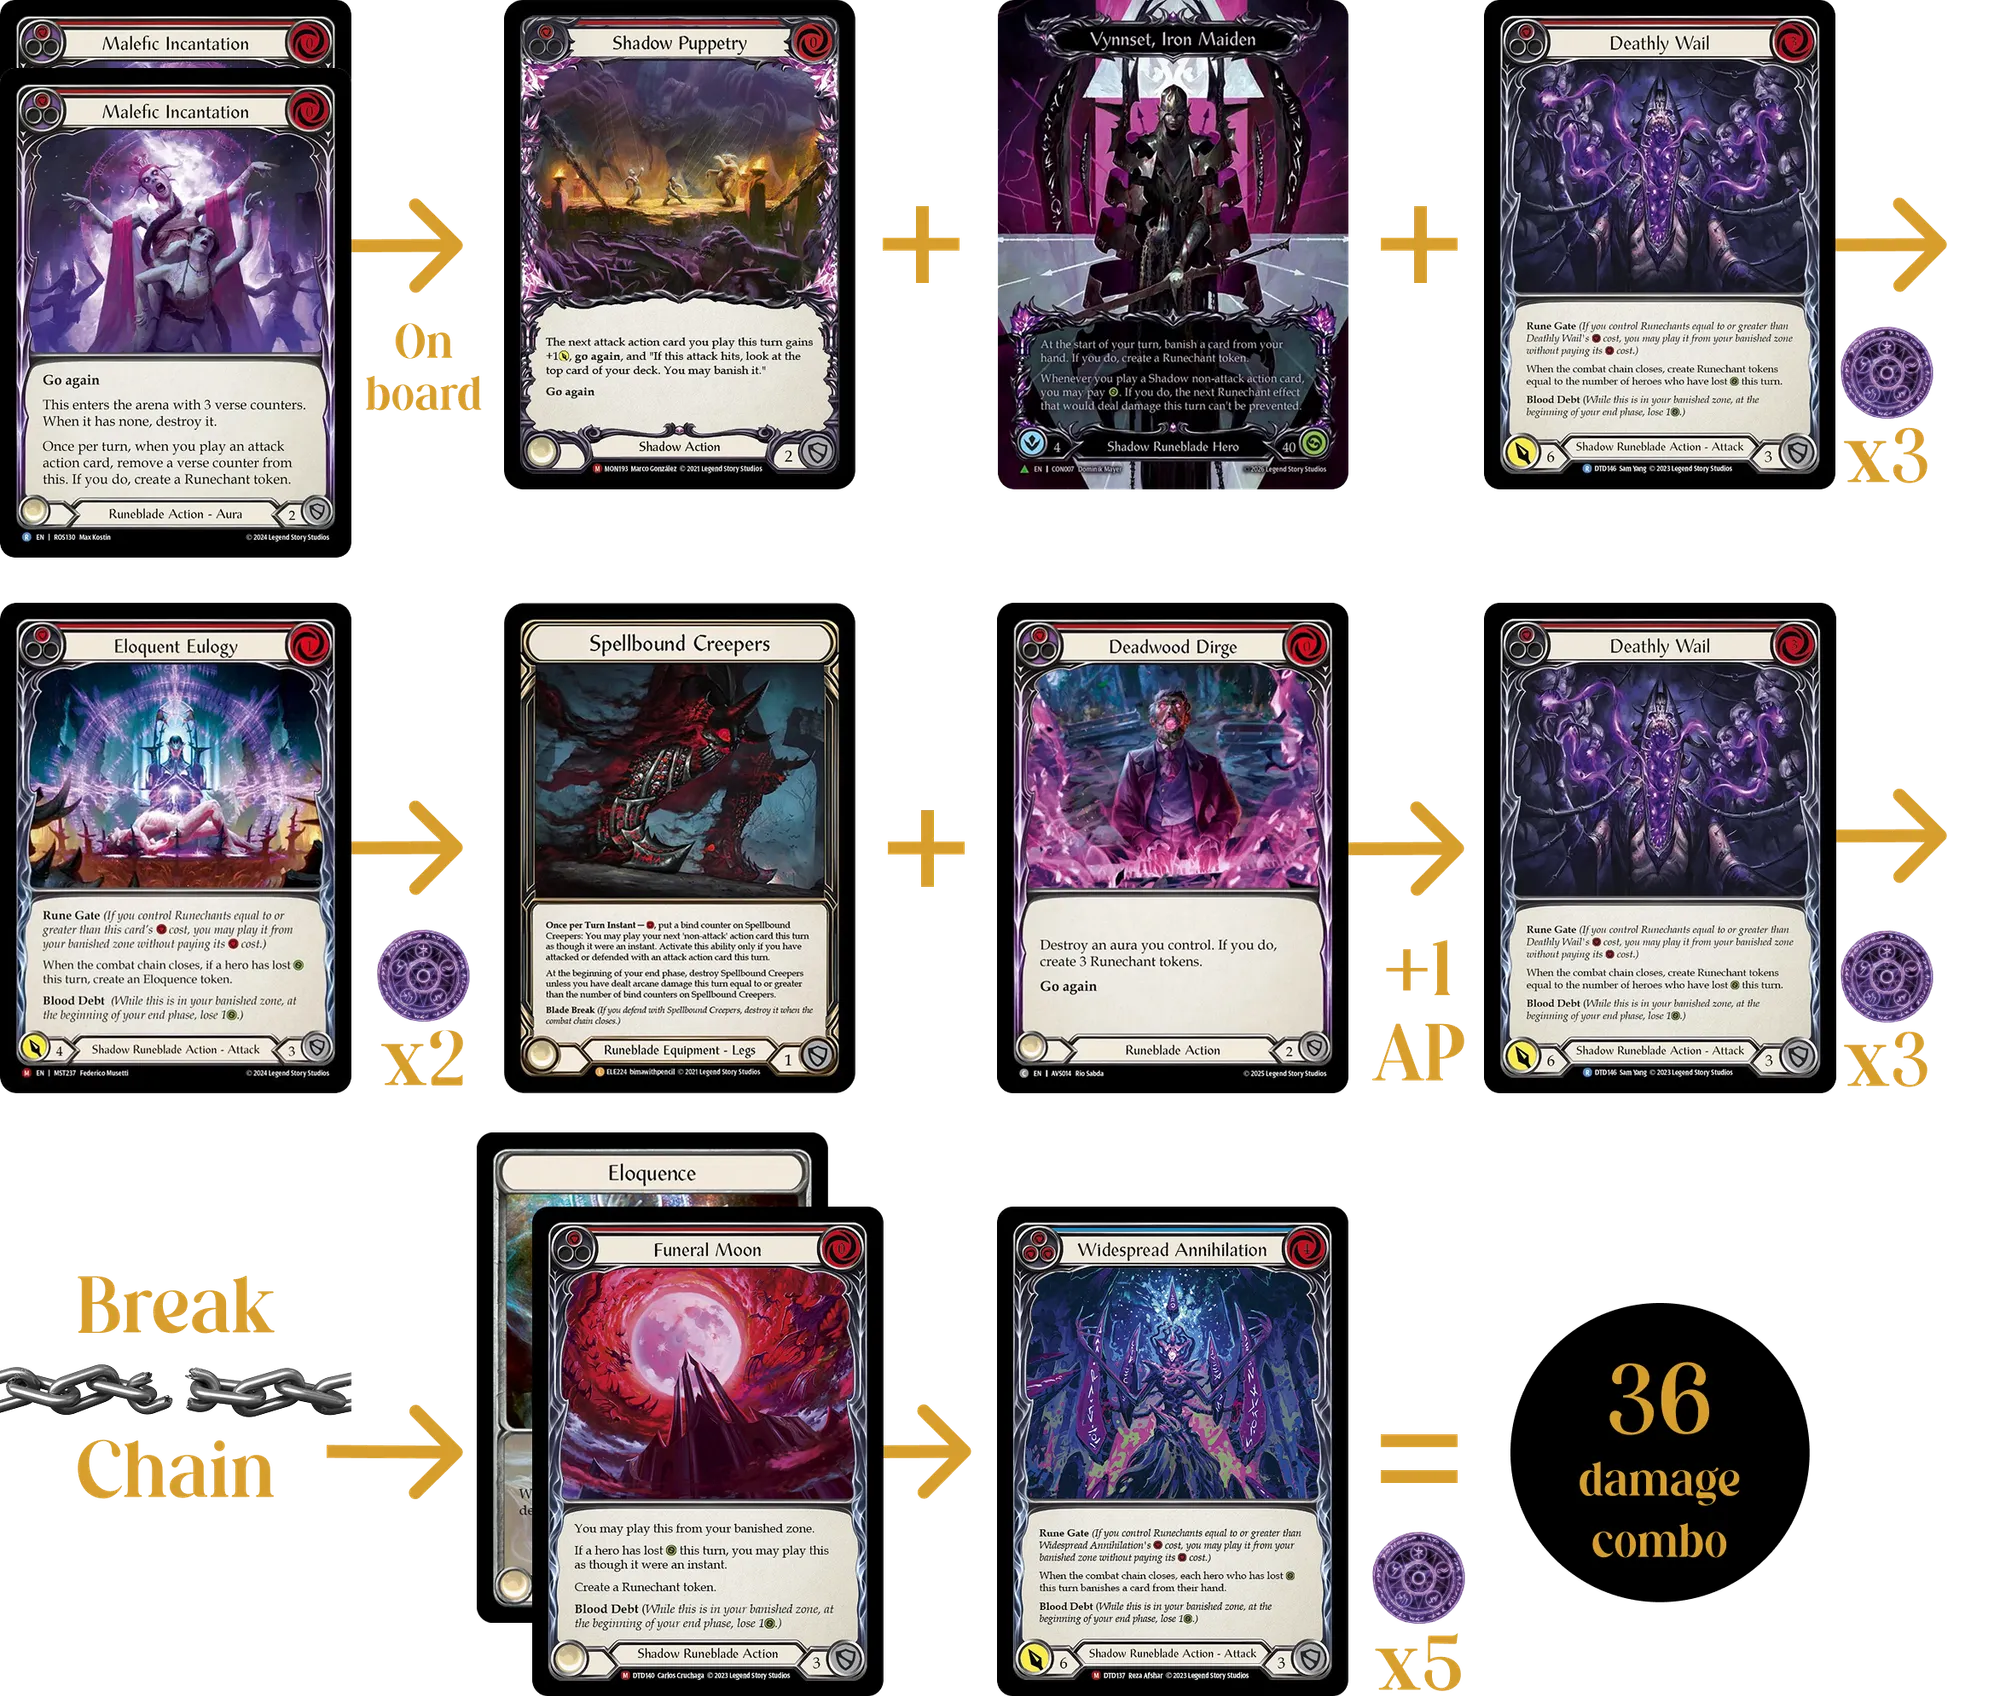
Later on, we will talk about how to execute this kind of large combo, but for now just know that against decks that are trying to convert their cards purely on defense, you have a lot of space to craft the perfect turn. These matchups are won on the back of activating Spellbound Creepers more than once, and ideally, more than twice. We will discuss how to do that later on too.
You lose these games by running out of space before you can pull the trigger on your big combo, and you’re forced to fire off a sub-par 20-ish damage turn instead. Take your time setting up a handful of Rune Gates, Culls, and Funeral Moons in your banished zone. Arsenal a Shadow Puppetry or similar and fill up your Tunic. Set a couple of Malefic Incantations on the field and keep your life total up with blocks. You want to create a situation where you can afford a chunk of life to keep a five-card hand and compress all of the damage you’ve been accumulating into one concentrated armor piercing salvo.
Despite the need to play towards an overwhelming offensive push turn, it’s important to remember that Vynnset’s combo is not deterministic. You cannot rely on that single combo turn to kill your opponent from full health through blocks. You will need to get some chip damage in, either before or after. To do that, and to overcome many midrange opponents, I often rely on chaining together double Rune Gates.
Chaining Double Gates
Vynnset’s true worst matchup is a defensively slanted midrange opponent. Decks that can reliably convert their hands offensively, but are perfectly happy to turtle up, are extremely dangerous to Vynnset. Depending on their lists, Kassai, Jarl, Hala, Olympia, Katsu, and a whole host of other matchups present this kind of threat. At the time of writing, this matchup profile is extremely common, putting Vynnset in a tough spot and requiring us to use a technique I learned from watching Brodie Spurlock’s many on-camera miracle games.
In many ways, this gameplan is as simple as it sounds. You’re trying to send two Rune Gates per turn, as many turns in a row as possible. The art of it is learning how to preserve your resources, so you can extend that offensive pressure seemingly indefinitely. When you play these games well, your opponents will bemoan that your cards “lined up perfectly” or that “sometimes the deck just doesn’t brick.” In reality, you were sweating the whole time.
Versus these flexible opponents, you’re trying to strike a balance: you want to set up enough so that you don’t run out of ammo, but not too much, or you’ll get run over. A tip for this kind of matchup is that Vynnset is allowed to pitch to pay for her attacks! With the deck so tightly focused around the Rune Gate mechanic, it’s easy to lose sight of Flesh and Blood’s fundamentals – like pitching – but paying for your cards the normal way has several subtle benefits:
- Pitching for a Rune Gate attack lets you save attacks in your banished zone, which will come in handy later.
- It also allows you to filter your hand away and dig for your critical action point and Runechant enablers.
In the next section, we’ll take a look at how to use specific cards to enact each of these gameplans, but I wanted to make special mention of this double Rune Gate strategy because it’s so important to overcoming your midrange and fatigue opponents.
Micro - A Grimoire of Techniques
So how do you actually execute these strategies? What cards do you play, on which turns, and in what order? Activating Spellbound Creepers multiple times is your path to victory in many matchups, so how do you keep them alive? To answer these questions, let’s get into the nitty gritty of Vynnset’s very deep arsenal of mechanical tricks.
Runechant Management
Runechants are Vynnset’s lifeblood, and one of the most effective ways to improve your gameplay is to improve your ability to manage them. The most generally applicable tip is to avoid using cards or equipment to generate more Runechants than necessary to attack with the next Rune Gate you want to send. As an example, if you have a Deathly Wail in your banished zone, the delta between two and three Runechants is 7 damage, but the delta between three and four Runechants is only 1 damage. You unlock an entire additional attack from hitting the exact number of Runechants you need, but anything more is often wasted.
There are many occasions when you spend several turns stacking up a bunch of Runechants, but in general, try to let your hero power set up your first Rune Gate of the turn naturally and spend your Runechant generators to fuel subsequent attacks. If you’re ever in doubt, ask yourself, “will playing this card allow me to send another Rune Gate, or can I save it for next turn?” If you can afford to save the card, it’s often best to tuck it in your arsenal, even if it means a slightly smaller amount of damage this turn. Knowing how to use your fuel efficiently will allow you to sustain the high powered offense that Vynnset needs to win games. Current Vynnset decks try to roll Runechants from one turn to the next, allowing you to sustain several turns of high offensive output in a row. While it’s too early to tell right now, this mindset may need to change with the introduction of the new Viserai, who loves to Usurp our Runechants and generally causing us a headache.
Malefic Incantation
This card is the backbone of the deck. Few other cards help Vynnset make Runechants within her own turn, and none other does it as effectively as Malefic Incantation. Most Vynnset players already love this card, so I won’t gush about it too much, but I want to touch on three uses for the card specifically.
- The flexibility of Malefic’s triggers make it one of the most effective ways to resolve Oblivion and summon Vynnset’s Embra, Nasreth. Nasreth will get its own section shortly, but the fact that Malefics and Runechants share the triggering event of “playing an attack action card” means that you can order those triggers to cast Oblivion from surprisingly low numbers of Runechants or hide Oblivion’s presence from your opponent until they have already committed cards to defending themselves from your arcane onslaught.
- Multiple Malefic Incantations can fuel a second Rune Gate without the need for additional cards. Saying that “having multiple copies of one of your best cards is a good thing” might sound obvious, but this point goes back to the discussion on efficiency from above. If you can spend a Machinations of Dominion to attack with a Deathly Delight and a Widespread Ruin, allowing you to preserve something like a Shadow Puppetry, Mordred Tide, Deadwood Dirge or Oblivion in your arsenal, you increase the advantage that having active Malefics already represents.
- Malefic Incantation can be used in more ways than simply playing it out at the beginning of the turn. You can save it in hand or arsenal to use as your non-attack action for Creepers, or you can pitch a yellow Malefic to hard-cast a second attack. Resolving a Malefic via your Creepers is especially effective if you can afford to send an attack action card after because it helps you end your turn on a Runechant from the freshly played Incantation. Malefic Incantation is one of your most flexible tools for hitting the perfect Runechant numbers that are so critical to Vynnset’s efficiency.
Deadwood Dirge
Where Malefic Incantation helps you roll efficiently from turn to turn, Deadwood Dirge kickstarts your engine with one big spike. Like Malefic, every Vynnset player knows and loves this card, so I will just mention a couple of neat tricks that you might not know about.
- Dirge can eat any aura on your side of the arena, not just Runechants. Many Vynnset players are aware that they can consume disease tokens bestowed upon them by their Assassin opponents, but there are many other auras running around the game of Flesh and Blood. Dirge can destroy a Runeblood Incantation that has sung its last verse because Runeblood Incantation, unlike Malefic Incantation, sticks around for one turn after its song has concluded. Interestingly, Dirge eats an aura upon resolution of its effect, meaning that the aura it will eventually process into Runechants may not exist at the moment you play the Dirge. This comes up when you have Grimoire of the Haunt, which you can activate in response to the Dirge, allowing Dirge to consume the resulting Eloquence. This does not work if the Eloquence exists before you cast Dirge because the Eloquence would see a non-attack action being played and destroy itself before the Dirge has a chance to resolve.
- Dirge can eat a Runechant whose trigger is already on the stack, allowing for that Runechant to both deal one arcane damage, and for the Dirge to meet its condition and create three more Runechants. This is only possible if you are able to activate Creepers in response to the Runechant trigger. For example, let’s say you attacked with a Deathly Wail that has Go Again from Shadow Puppetry. Once all the Runechants resolve, and the Deathly Wail becomes an attack on the combat chain, your Creepers are legal to activate for the remainder of the turn. You can close the chain, creating two Runechants, and attack with a Deathly Delight. In response to the Runechants’ triggers, you can activate Creepers to play Deadwood Dirge at instant speed, generating an action point and three fresh Runechants, without sacrificing a single point of arcane damage for the turn.
Oblivion
Summoning Nasreth is one of the many payoffs for managing your Runechants well. Resolving Oblivion often seesaws the odds of winning in your favor. Despite its power, you can still maximize Nasreth’s value by ensuring you attack with it at minimum on the turn it comes down. It is often better to wait for an opportunity to generate an action point to attack with your ally even if you have the Runechants to resolve Oblivion now. If Nasreth attacked once before being killed, Oblivion generated a whopping 12 points of value. When you simply summon it to be killed immediately, you only get half that. Here are some of the tips I’ve learned about this inhabitant of the Shadowrealm.
- Malefic Incantation triggers can be arranged in any order around your Runechant triggers, allowing you to hide Oblivion from your opponent until you have seen them commit cards to prevent arcane damage. Landing Nasreth at the last possible moment minimizes the chances of your opponent having the ability to kill it. At the very least, your opponent may identify that they need to kill Nasreth and be forced into taking additional damage so they can preserve at least 6 damage in their hand.
- Nasreth is not a weapon or an attack action card, so using its ability to attack does not trigger Runechants. This lets you use a Runechant-generating non-attack like Deadwood Dirge to make an action point with Spellbound Creepers and preserve Runechants for next turn, while continuing to present meaningful offensive pressure.
- While Nasreth is on the board, you are heavily incentivized to attack with it every single turn. A Nasreth that attacks once before being killed generates 12 value, but a Nasreth that attacks four times generates 30! When you’re trying to slog through midrange opponents, using Nasreth as your “second Rune Gate” can utterly drown them in value.
How To Do a REALLY Big Combo
Anyone who’s played a good amount of Vynnset has had turns where they present around 20 damage. It just kind of happens when red Deathly Wail represents 9 damage on its own. But how do you achieve those truly massive turns? What ingredients elevate a good turn to a great turn? Making the number go as high as possible is one of the reasons I play this hero, and I suspect it’s one of the reasons you do too. To get the really big numbers, you’ll need the right mix of action points, Runechants, and ammunition, so let’s look at each category to understand why.
- Action points - a huge turn requires at least three, sometimes four, chain links. You can generate action points with Go Again enablers like Shadow Puppetry, with instant speed non-attacks via Spellbound Creepers, and with Eloquence tokens combined with Cull.
- Runechants - you won’t have much to do with your action points if you don’t have the right number of Runechants at the correct spots in your turn. Use your Dirges, and Malefics to make Runechants in between your attacks, so you’re not wasting any. Funeral Moons do double work here as both Runechant and potentially action point generators via Eloquence.
- Ammunition - you’ll want to spend the fuel you generate on high quality attacks, so it’s important to set up nearly an entire hand’s worth of extra attacks in your banished zone. Large amounts of Blood Debt can be intimidating, but a huge part of Vynnset’s power comes from her ability to store damage over multiple turns. Use your cards to block more as you accumulate additional attacks.
Once you’ve found a couple of action point generators, gotten your Runechant engine set up, and stored enough attacks in your banished zone, you’re ready to hunt for a chance to combo off. In a proper setup, you should’ve blocked enough while you set up that you can afford to take a hit. If your opponent fails to disrupt your five-card hand, it’s time to GO.
Take your time as you decide which card to banish from your hand. Be patient as you take your game actions. These turns make or break the game, so there’s no need to rush. Be cognizant of when you break the chain. You’re looking for opportunities to generate perfect numbers of Runechants with Deathly Wails, Dirges, and Malefics. You're looking to recur threats or utility from your graveyard with Deep Recesses of Existence. You’re often looking for spots to generate Eloquence to combine with Cull and Funeral Moon to make the turn go even wider. I have found that you don’t need to think too much about the exact number you’re hitting while you’re doing it, so just empty the clip to the best of your ability and count up the damage in the aftermath. Cards like Mordred Tide or Revel in Runeblood make these turns go truly insane, so try to find the right spot to deploy them.
As a final note on the big combo turns, it’s often beneficial to leave one or two Rune Gates in the banished zone, so you can still present a double or triple gate turn immediately after. That will help you get the most out of your Creepers and keep your opponent from regaining their footing.
Flexible Power Cards
Deep Recesses of Existence
Vynnset’s newest Rune Gate added new dimensions to the deck. The ability to access her graveyard enables some crazy plays, from piling on disruption to fueling the pain train into future turns. Because of its flexibility, Deep Recesses is one of Vynnset’s premium Rune Gates, and I try to avoid expending it unless I can activate its self banish ability via life loss. Deep Recesses also incentivizes paying attention to your graveyard’s contents much like how Assassin players keep track of their available options for Codex of Frailty.
- What I’m looking for in my own graveyard: When I draw a Deep Recesses, I want to see cards like Deathly Wail, Cull, Funeral Moon, cheap Rune Gates, and Putrid Stirrings in my own graveyard. At its simplest, Deep Recesses lets you buy an extra copy of red Deathly Wail, which is your best Rune Gate. If you need to disrupt your opponent, grabbing Cull is the best move. Even the threat of recurring a Cull can cause your opponent to contort themselves to play around it. Though it is not the most powerful use of Deep Recesses’ effect, grabbing a Funeral Moon or cheap Rune Gates can be a helpful value play to fill out a turn where you’re light on back-end Runechant generation or attacks. Finally, Putrid Stirrings has become a newly discovered pet card for me because of how much it helps buoy the tough Warrior and Guardian matchups. Pitching a card from hand for 5 power Go Again with a life loss trigger attached is pretty good when you do it once, but recurring it twice or even three times into these slower matchups can be truly smothering.
- What I’m looking for in my opponent’s graveyard: Deep Recesses is a symmetrical effect, and a lot of decks have at least one piece that they care about manipulating in their graveyard. Banishing a Phoenix Flame, Kunai of Retribution, Graven Call, or Sawbones can seriously mitigate opponents’ offensive capabilities, while banishing one of Kassai's yellows or the last Earth card from a Jarl can occasionally yield incidental benefit by denying their ability to banish the card themselves for value.
Cull
Cull is, unsurprisingly, extremely powerful. It offers three types of benefits: it can disrupt your opponent, it can draw you cards, and it can generate action points in combination with other cards that you already like playing. Let’s look at the nuances of each power one at a time.
- Stripping a card from your opponent’s hand at instant speed is crazy strong, obviously, but it can be more powerful than that. When your opponent sees a Cull face up in your banished zone, they have to play around it or risk getting blown out. They’ll often try to hold something like a Sigil of Solace, to bait you into playing Cull then play the instant in response, negating your Cull’s power. Most opponents are relatively easy to read when they try to avoid Cull in this way, and the way to counter their bluff is to simply keep holding the Cull over their head. Much like a Pummel or a Tarantula Toxin, your opponent can’t play around Cull forever, and if you’re patient, you can absolutely juice them at the worst possible moment.
- Moving your cards to the banished zone can be hugely beneficial, helping you set up double Rune Gate turns without an attack already banished, but it can also be awkward. Cull is powerful, but that power is not free. You can easily have a card in hand that you don’t want to banish. It’s often totally fine to save the Cull until that card has been safely tucked into your arsenal.
- When combined with an Eloquence token, Cull and its buddy Funeral Moon can generate action points out of thin air. If you have an Eloquence, a Cull, and any Shadow non-attack (including a second Cull), you can play the Shadow non-attack, and order the Vynnset life loss trigger to resolve first. Once you’ve paid a life, you can play the Cull at instant speed in response to the Eloquence trigger, and the Eloquence will trigger again. The Eloquence will give Go Again to both non-attacks, generating two total action points.
- Fasting Carcass works in a similar way. You can play the Fasting Carcass, pay a life, allow Carcass to resolve, then play a Cull at instant speed. Fasting Carcass will bestow Go Again to the Cull as “the next red action card” you play that turn. You can use this trick when Cull is in the banished zone, but you can also use it to generate an action point with Deep Recesses. You play the Carcass, pay a life to activate Deep Recesses, and banish the Cull from your graveyard when the chain closes. Because you paid a life to Fasting Carcass at the beginning of the turn, Cull is playable at instant speed with Go Again!
- Finally, remember that Cull blocks! If you don’t have a good opportunity to resolve Cull, convert it on defense and leave it in the graveyard ready for the next time you draw the previously mentioned Deep Recesses of Existence.
Spellbound Creepers
“Spelly Creeps is the most powerful piece of equipment in Vynnset.”
That’s a safe statement.
“Spelly Creeps is the most powerful card in the whole deck.”
That’s probably safe to say. The deck does have a lot of strong cards these days, though.
“Spelly Creeps is the most powerful equipment card ever printed.”
That’s probably a little more controversial, but I think it might be true.
To win games against aggro, you sometimes need Creepers’ reach to threaten lethal or surprise disruption, and you almost always need its block value. To win games against midrange and fatigue, you need to activate them at least twice, and that means you need to keep them alive.
Many Vynnset players write off aggro matchups as something they don’t need to concern themselves with practicing. However, finding opportunities to use Creepers and then blocking an on-hit can be the difference between stopping a five-card hand and getting hit with Lava Burst for lethal. Though the matchup is favored, we can’t afford to be complacent against fast opponents. I sometimes see new Vynnset players using Creepers to land a Succumb to Temptation when they fail to deal arcane damage, which would make Temptation playable at instant speed naturally. They’ll then send a Flail of Agony without generating another Runechant, and their Creepers will die at the end of the turn because they dealt 0 arcane. A few turns later, they no longer have Blade Break 1 on the table, so they’re forced into a tight spot when their opponent presents a Snatch. The hope against aggro is to get both sides of Creepers’ value, the action point and then the block, but sometimes you’re forced to accept that all they are is a very shiny copy of Ironrot Legs.
Fatigue matchups are a whole different beast. You’re trying to get, at minimum, two action points out of Creepers, so you have to be particularly careful about when to use them. The safest way to get those two action points is to activate Creepers two turns in a row. The first activation starts a clock, which heavily incentivizes subsequent activations to squeeze out more action points before the Creepers expire. You should consider using Creepers for the first time only on turns where you’ve guaranteed their survival by paying life to Vynnset’s hero power, or by sneaking a Runechant through the old fashioned way. Getting the first Creepers activation is as simple as knowing when it is legal to do so, but keeping them alive until you can find a good spot to use them a second time can be a tricky task. Here are some of the ways I think about doing that.
- Unlike other Runeblades, Vynnset has the ability to pause the clock, guaranteeing her Creepers survive for multiple turns because of her ability to force through Runechants by playing Shadow non-attacks. I like to arsenal my Shadow non-attacks early and often. They’ll stay in the arsenal for a couple of turns sometimes, waiting for a second Shadow non-attack to join the hand. With access to two Shadow non-attacks, I can freely activate Creepers the first time with assurance that I can play the other Shadow non-attack next turn, ensuring Creepers’ survival for at least one more turn. This single extra turn is often enough to set up the second activation with more selectivity. Even if I don’t find a good place to activate Creepers again, the extra turn sometimes bridges me to a third Shadow non-attack, and occasionally even a fourth. The reward for steadily using one hero power per turn is that you can buy enough time for Tunic to undergo another full charge cycle, which lets you activate Creepers with a free resource a second time.
- Even if you manage to extract both of your required Creepers activations, you may need to get to a third. Vynnset’s wonderful hero power can help you do that, but two-counter gamestates can get scrappy. The cleanest way to force through two arcane damage is to play a standard Shadow non-attack like Beseech the Demigon, attack to trigger multiple Runechants, then pay another life to a Funeral Moon or Cull in response to the second Runechant to make sure that hits, too. But, even if you don’t have any attack actions, you can still turn on Culls and Funeral Moons with the life loss from Flail of Agony, enabling you to pay a grand total of 3 life to sustain your Creepers just one more turn. It’s a steep price to pay, but against some defensive opponents, your own life total doesn’t matter at all, and your only path to victory is to execute multiple large combo hands.
- If all else fails, you still have access to traditional Runeblade techniques for keeping your Creepers. Large stacks of Runechants can still present effectively unpreventable damage. Mordred Tide turns sometimes leave behind upwards of six Runechants, possibly buying another turn of Creepers. Plus, Vynnset is still allowed to activate Creepers multiple turns in a row, even if she doesn’t always have to. If I find myself without many Shadow non-attacks, I will usually pitch a card to pay for the first activation manually to save my Tunic resource for the next turn in case I don’t draw a Shadow non-attack.
Ending the Game
Before I sign off, I want to talk about the three endgame states that Vynnset finds herself in: The Good, The Bad, and The Ugly.
You want to arrive at the end of the game with some amount of gas left in the tank. Every hero in Flesh and Blood cares about their life total in the end game, but Vynnset’s life total, more than almost anyone else, directly translates point-for-point into damage inflicted on the opponent.
The Good endgames happen when you push your opponent sub-ten life before you get there yourself. These are the games where you have utterly overwhelmed your opponent, and they are just trying to survive until you run out of gas. In these situations, you have the freedom to spend life liberally to ping them to death or blow them up with multi-Rune Gate hands using all the techniques described in previous sections. Your main constraints here are your action points, and each turn presents the question of whether you can generate an extra action to apply more pressure. When you have so much space to find a closer, try very hard not to IP. Your goal is to dig as fast as possible for your Go Again pieces, remaining Runechant generators, and Shadow non-attacks before your opponent can recover enough tempo to attack you back. Failing to convert cards drastically reduces your ability to move through your deck and is your opponent’s path back into the game. Don’t let them take it!
The Bad endgames occur when you’ve been pushed to sub-three life before or at the same time as your opponent. Three life is the critical number, because it allows you to pay one life to a Shadow non-attack and pay one life to Flail. Once you are below that threshold, you’ve already been cut off from at least one avenue of attack, and your options are immediately limited. Avoiding this end game requires blocking more or applying more pressure in the early and mid game. Vynnset needs to choose which path to go down carefully; she either wants to tear out of the gate and explode her opponent, or she wants to patiently set up powerful combo turns while keeping her life total high. Your draws will tell you which path they want you to take, and it’s up to you to identify it. If you find yourself in the bad endgame, it means you weren’t able to set up your engine quick enough, or you didn’t properly assess which cards were truly worth taking damage for. Winning bad end games is possible, but it usually requires the game to be very close, and your opponent to stumble. Avoid this one at all costs.
The Ugly endgames occur when you are around three life, and your opponent is around one or two. These endgames sometimes end with you spending one life to the Flail of Agony, enabling Cull or Funeral Moon’s instant speed ability because someone has lost life, then using your second to last life point to make your one Runechant unpreventable and kill your opponent “from nothing.” They also sometimes end with you tripping at the finish line and your opponent cheesing you with a Lightning Press. You have to play extremely smart in these situations and identify not only your own outs but your opponent’s as well. The ugly endgames I’ve played are often my favorites because they represent something fundamental about Vynnset and about Flesh and Blood broadly. You start full, and you need to expend the resources available to finish the game. Vynnset, in a different way than most heroes, demands that you consider each of those resources all the way down to the last point of life. Usurp the Shadowthrone is literally days away, and Vynnset will need to adapt to new threats. Her cards will evolve, but Vynnset will always reward knowledge and creativity.
I hope this article gave you some helpful tools to help guide your thinking as we enter the newest metagame. Good luck out there!

Nick Reuter
I attribute my success with Vynnset to kissing the Blarney Stone and being imbued with the gift of Eloquence.